graspPlugin(en)
graspPlugin for Choreonoid
graspPlugin is a software for robot systems having a robotic hand at the tip of a robotic manipulator. By using the graspPlugin, we can solve several planning problems such as the grasp planning, the trajectory planning and the task planning. To solve several planning problems for several configurations of robot systems, the software should be flexibly customizable. So as to flexibly customize the software, the graspPlugin is developed as a set of plug-ins of Choreonoid. Here, Choreonoid is a software originally developed for choreographing the motion of a humanoid robot in OpenRT Platform project. The merit of using Choreonoid is that we can extend the functions of Choreonoid developed so far. For example, we can use the basic functions of Choreonoid such as the math library, the robot kinematics description, and the collision detection function.
We would like to note that we ported the MPK (Motion Planning Kit) developed in Stanford university as a plug-in to plan the collision-free trajectory. By the kindness of Prof. Jean-Claude Latombe, we can include MPK as a part of the graspPlugin. When you download the graspPlugin, we would be happy if you send an e-mail to grasp-plugin-webmaster[at]m.aist.go.jp (please replace [at] by @) describing the name and the affiliation. Then we can collect the the personal information of the users of MPK.
Also, if you want to join the developers team of graspPlugin and want to share the developed plug-in, please let us know too.
Developers:
Tokuo Tsuji(Kyushu univ. / AIST)
Kensuke Harada(AIST)
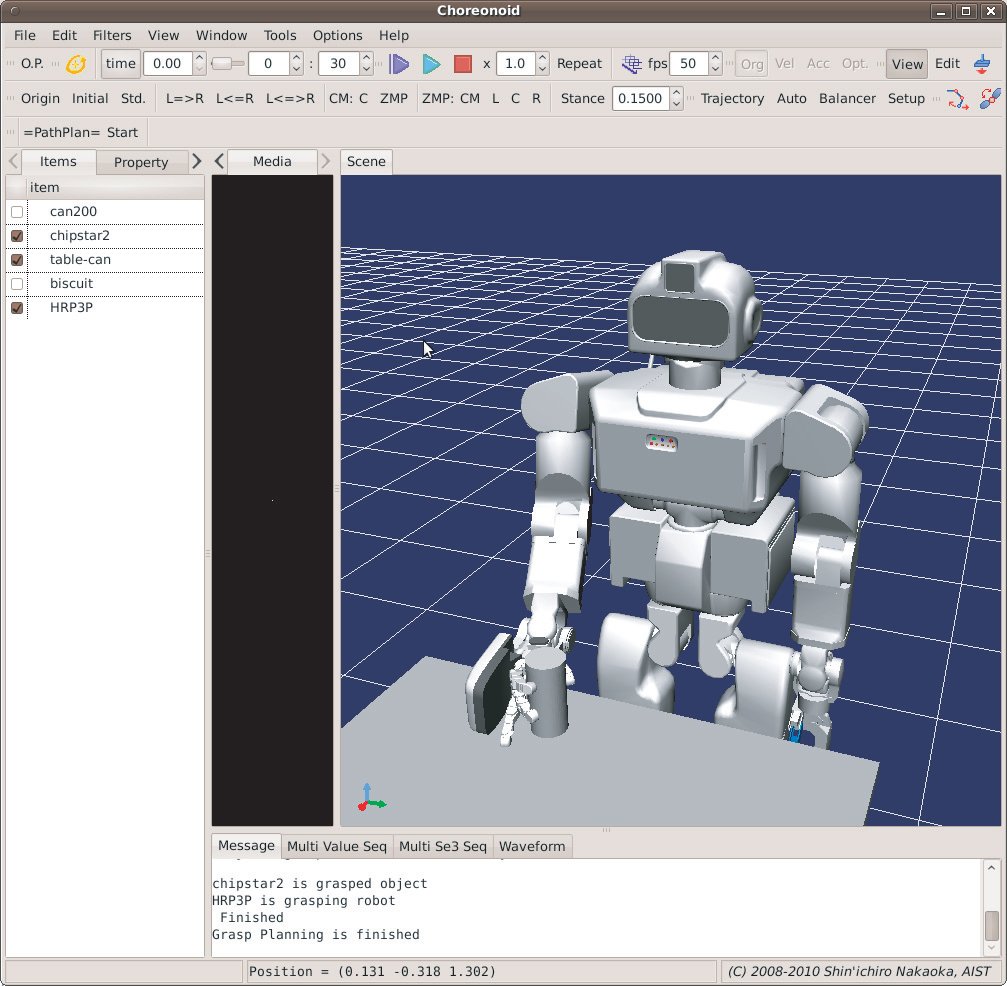
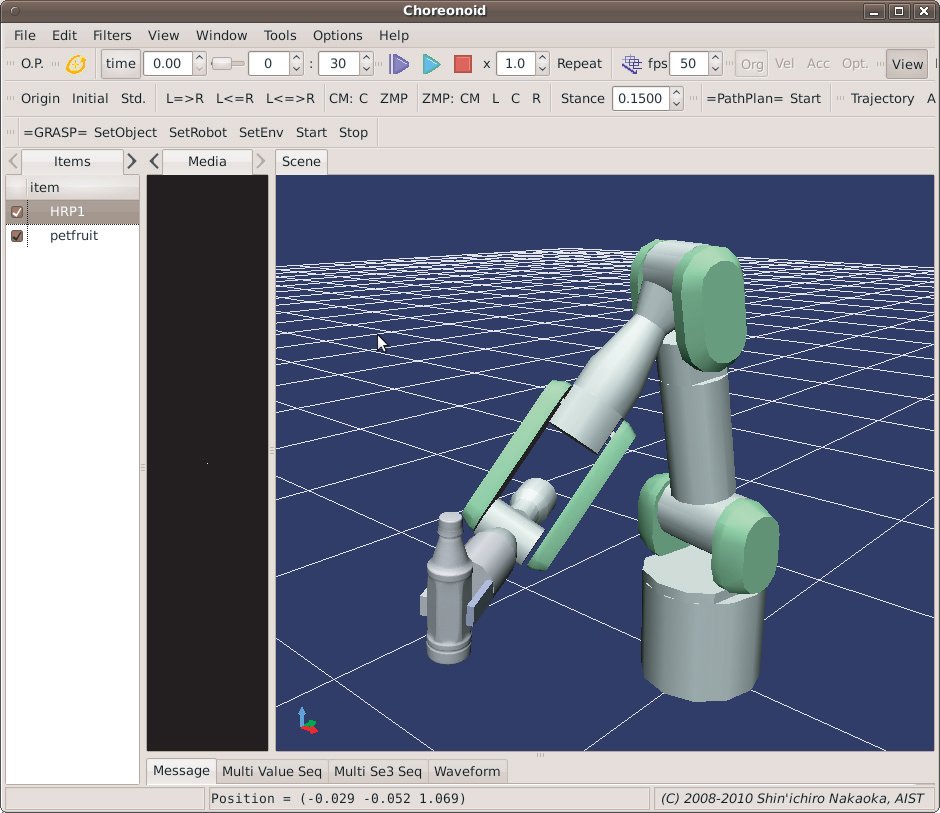
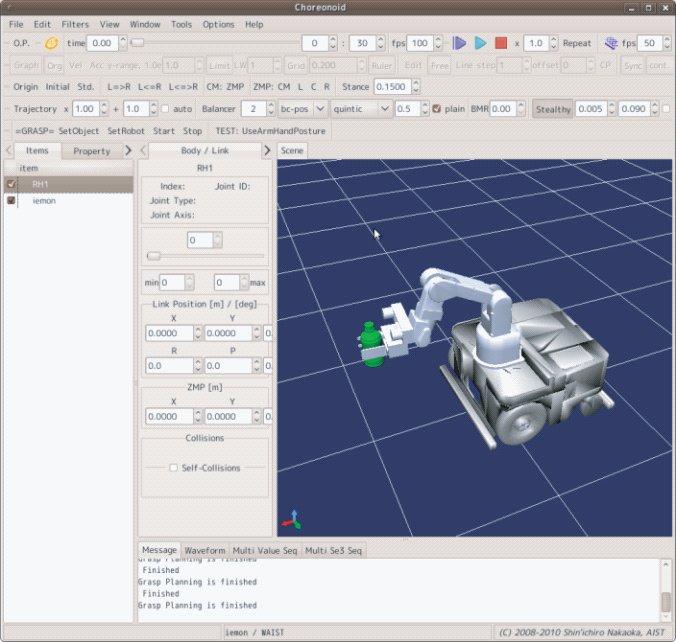
In the following, we show the result of grasp planning for the humanoid robot HRP-3, PA10, and RH-1 developed in the NEDO project.
List of plug-ins
| Name | Abstract | Remarks |
|---|---|---|
| Grasp | Grasp planning for multi-fingered hand. Basic functions commonly used by other plug-ins. | Grasp planning is applicable for PA10, HRP3 Hand, SmartPAL-5, RH1 |
| PRM | Trajectory planning avoiding collision with obstacles. | Ported MPK(Motion Planning Kit developed in Stanford university. |
| GraspConsumer | OpenRTM consumer for Grasping motion planning module developed in the NEDO project. | |
| VisionTrigger | OpenRTM interface connecting with OpenVGR. | Rewritting the position/orientation of the object defined in the Grasp plug-in. |
| RobotInterface | Providing functions to control robots. | Applicable for HIRO using OpenRTM interface. |
| RobotModels | Database of robot geometrical models and functions used for each robot. | HIRO, PA10, HRP2, HRP3, SmartPAL, RH1(Only PA10 is available for the release version) |
| GeometryHandler | Analysis of the geometry models such as VRML. | Generating the parameter files used in the grasp planning (Not included in the released version). |
| GripperManipulation | Pick and place planning for parallel grippers. | Applicable for HIRO and PA10. (Limited function for the released version) |
| RtcGraspPathPlan | Sequencially planning the grasp planning and the trajectory planning and send the joint trajectory with OpenRTM interface. | Used in the H23 NEDO project (Not included in the released version) |
| EditModel | Edit the shape of a rectangular. | Used when introducing a new hand model in Grasp plug-in. |
| PCL | Interface with the Point Cloud Library. | (Not included in the released version) |
| RosInterface | Interface with ROS. |
Installing
Tutorial
Operation of Choreonoid
Development
Choreonoid 1.0 Basics
Installation of graspPlugin environment
Installing OpenRTM
Install OpenRTM-aist 1.0.0-RELEASE on Ubuntu 10.04 using the batch setup script. If you have already completed the installation of OpenRTM, you can skip this section and proceed to the next section.
Download the batch setup script, pkg_install_ubuntu.sh for Ubuntu, from the OpenRTM-aist-1.0.0-RELEASE website ((http://www.openrtm.org/openrtm/ja/node/849).
(Note: The file is listed as “pkg_install_ubuntu.sh” on the website, but the name actually changes to “pkg_install_ubuntu100.sh” when downloaded.)
When not using a browser, the file can be downloaded via wget as follows: (from here on, the lines inside the text box starting with a “%” represent commands entered at the computer terminal; however, do not include the “%” at the beginning of your entries at the computer terminal.)
% wget http://openrtm.org/svnroot/OpenRTM-aist/trunk/OpenRTM-aist/build/pkg_install100_ubuntu.sh
The necessary packages are automatically installed when the following script is executed at the command line.
% sudo sh pkg_install100_ubuntu.sh
Prompts, such as those described below, appear many times during execution. Respond with a “y” to all such prompts and continue.
Example 1
 No repository entry for OpenRTM-aist is configured in your system.
 repository entry for OpenrRTM-aist:
    deb http://www.openrtm.de/pub/Linux/ubuntu/ lucid main
 Do
Example 2
 After this operation, XXXMB of additional disk space will be used.
 Do you want to continue [Y/n]?
Example 3
 WARNING: The following packages cannot be authenticated!
   xxxx-xxx
 Install these packages without verification [y/N]?
When prompted for “”[Y/n],” pressing the Enter key would be considered a “y” and installation would proceed. However, when prompted for “[y/N],” unless the “y” key is explicitly pressed and followed by the Enter key, the entry would be considered an “n” and the installation would be aborted. If the installation is aborted accidentally, execute the pkg_install_ubuntu.sh package once again.
Building Choreonoid
The installation procedure for Choreonoid (integrated software for choreographing robotic motions) is outlined below. In this section, only Choreonoid is built and executed, instead of installing the graspPlugin in one shot. The installation directory is taken as “~/src/choreonoid-1.0.0.”
Acquiring the source for the build
Download the source package file “http://choreonoid.org/_downloads/choreonoid-1.0.0.zip” from the official Choreonoid site (http://choreonoid.org/en/). Unzip and extract the files by specifying “~/src” as the destination directory to create the “~/src/choreonoid-1.0.0” directory for the extracted files.
Once the computer has booted, make the “~/src/choreonoid-1.0.0” directory your current directory.
% cd choreonoid-1.0.0
Installing the required packages
Execute the batch installation script that is available at choreonoid /misc/script.
 % cd choreonoid/misc/script
 % sudo ./install-requisities-ubuntu.sh
  (an omittion)
 Need to get xxxMB of archives.
 After this operation, xxxMB of additional disk space will be used.
 Do you want to continue [Y/n]?
A large volume of packages will be installed. Re-execute the script if a failure occurs prior to completion.
 % sudo apt-get update
 % sudo ./install-requisities-ubuntu.sh
Installation of libgstreamermm-0.10-dev and libqt4-phonon-dev is also necessary, so enter them manually.
% sudo apt-get install libgstreamermm-0.10-dev libqt4-phonon-dev
Once this is completed, return to the Choreonoid directory.
% cd ../..
Building Choreonoid using ccmake
Invoke ccmake to generate the Makefile.
% ccmake .
ccmake displays only “EMPTY CACHE” on its first launch.

Figure 2. ccmake: EMPTY CACHE
On pressing the “c” key to configure, a menu showing the key and values should be displayed within a few seconds.

Figure 3. ccmake: configure
On pressing “c” again, a new menu item will be displayed in the lower section of the screen displaying the message, “Press [g] to generate and exit.”

Figure 4. ccmake: generate and exit
Press “g” to exit ccmake. The Makefile will be generated by this “generate and exit” operation. Execute make and build Choreonoid.
% make
The execution time will vary depending on the PC used.
Invoking Choreonoid
Once the execution of make is completed, execute Choreonoid.
% bin/choreonoid
If a startup screen like the one shown below appears, Choreonoid has been built successfully.

Figure 5. Choreonoid startup screen
Building graspPlugin
The procedure for installing graspPlugin is outlined below.
Installing essential software
It is essential that OpenRTM and Choreonoid be installed before the installation of graspPlugin.Installing Subversion
Since subversion is required for the installation of graspPlugin, install the same, if it is not already installed.
% sudo apt-get install subversion
graspPlugin source check out
Use subversion to check out and extract the graspPlugin source under the “extplugin” directory of “~/src/choreonoid-1.0.0.”
 % cd ~/src/choreonoid-1.0.0/extplugin
 % svn checkout http://grasp-plugin.googlecode.com/svn/trunk/graspPlugin
Installing essential packages
Execute the graspPlugin installation script (a user password is required).
% ./graspPlugin/Grasp/install-requisities-ubuntu.sh
Furthermore, the wx-common package is also required.
% sudo apt-get install wx-common
If the wx-common package is not present, the configure step of ccmake will fail with a “wxWidgets_wxrc_EXECUTABLE NOT FOUND” message.
Building graspPlugin using ccmake
In order to install graspPlugin as a plug-in, change Choreonoid’s build settings using ccmake.
 % cd ~/src/choreonoid-1.0.0
 % ccmake .
To build graspPlugin, it is necessary to edit the items using ccmake.
In ccmake, the items displayed on the left half of the screen with a white background are the keys, while the items displayed on the right half with a black background are the values for those keys. Use the “UP” and “DOWN” arrow keys to move the cursor to the desired item and press the Enter key to edit the desired value. After modifying the value, press the Enter key again. This releases the cursor to move UP and DOWN again.
Pressing the “c” key twice will configure and create two items: GRASP_PLUGINS and GRASP_ROBOT_MODEL_PLUGINS.

Figure 6. ccmake: Editing the keys
Set the following values to the respective items:
| Key | Value |
|---|---|
| GRASP_PLUGINS | Grasp;PRM;GripperManipulation;VisionTrigger;RobotInterface |
| GRASP_ROBOT_MODEL_PLUGINS | HIRO/Plug-in |
Once the values have been edited, press “c” to configure. Next, press the “g” key to generate the makefile and exit. Then, execute make to build Choreonoid and the plug-in.
% make
Execution
Execute Choreonoid.
% bin/choreonoid
If a screen like the one below is displayed, the execution is successful.

Fig 7. graspPlugin execution screen
In comparison to the build using Choreonoid alone, the toolbar now contains increased options due to the addition of graspPlugin. Furthermore, messages to the effect of “.... plug-in file being loaded” and “... plug-in being activated” are displayed in the message tab.
Building GraspPlannerComp(Option)
The compilation method for the grasping motion planning module, GraspPlannerComp, is described below.
Preparing the environment
It is assumed here that the installation of Choreonoid has already been completed.
Building
Navigate to the directory where the source for the GraspPlanner main body is located and then execute make.
 % cd ~/workspace
 % cd Choreonoid/extplugin/graspPlugin/GraspConsumer/GraspPlan20100623/
 % make
Build is executed in the process briefly outlined below.
 `rtm-config --idlc` `rtm-config --idlflags` -I`rtm-config --prefix`/include/rtm/idl GraspController.idl
 rtm-skelwrapper --include-dir="" --skel-suffix=Skel --stub-suffix=Stub --idl-file=GraspController.idl
 GraspControllerSkel.h  was generated.
 GraspControllerSkel.cpp  was generated.
 GraspControllerStub.h  was generated.
 GraspControllerStub.cpp  was generated.
 rm -f GraspPlanner.o
 g++ `rtm-config --cflags` -I. -c -o GraspPlanner.o GraspPlanner.cpp
 rm -f GraspPlanningImpl.o
 g++ `rtm-config --cflags` -I. -c -o GraspPlanningImpl.o GraspPlanningImpl.cpp
 rm -f GraspControllerSkel.o
 g++ `rtm-config --cflags` -I. -c -o GraspControllerSkel.o GraspControllerSkel.cpp
 rm -f GraspControllerSVC_impl.o
 g++ `rtm-config --cflags` -I. -c -o GraspControllerSVC_impl.o GraspControllerSVC_impl.cpp
 rm -f GraspPlanner.so
 g++ -shared -o GraspPlanner.so GraspPlanningImpl.o GraspPlanner.o GraspControllerSkel.o   GraspControllerSVC_impl.o   `rtm-con rm -f GraspPlannerComp.o
 g++ `rtm-config --cflags` -I. -c -o GraspPlannerComp.o GraspPlannerComp.cpp
 g++ -o GraspPlannerComp GraspPlanningImpl.o GraspPlanner.o GraspControllerSkel.o   GraspControllerSVC_impl.o   GraspPlannerCom
If the final product, GraspPlannerComp, can be executed, then the process has been completed successfully.
% ./GraspPlannerComp
No message is displayed for the execution.
Installing the full complement of Eclipse(Option)
In order to run the full complement of Eclipse (OpenRTM Eclipse tools), the JDK from Sun is required, rather than the Ubuntu standard Open JDK.
Installing sun-java6-jdk
In order to install JDK sun-java6-jdk from Sun, the apt repository must first be added and then the package list must be obtained.
 % sudo add-apt-repository "deb http://archive.canonical.com/ lucid partner"
 % sudo apt-get update
At this point, he installation of the JDK package is now possible.
 % sudo apt-get install sun-java6-jdk
 Upgrades: 0; new installation: 8, deletions: 0; retentions: 0.
 An archive of 57.0 MB must be acquired; 168 MB of additional disk space will be used up following this operation.
The following screen display is shown during the process. Select “OK” and continue.
When the following screen is displayed, select “Yes.”
Once the installation is complete, set java in the default setting to sun-java6.
% sudo update-alternatives --config java
If the following message appears at this point, then there are no problems.
There is only one alternative in link group java: /usr/lib/jvm/java-6-sun/jre/bin/java Nothing to configure.
If the message is something like the one shown below, then it will be necessary to manually ensure that it is called Sun Java.
There are 3 choices for the alternative java (providing /usr/bin/java). Selection Path Priority Status -------------------------------------------------------- 0 /usr/lib/jvm/java-6-openjdk/jre/bin/java 1061 auto mode * 1 /usr/bin/gij-4.4 1044 manual mode 2 /usr/lib/jvm/java-6-openjdk/jre/bin/java 1061 manual mode 3 /usr/lib/jvm/java-6-sun/jre/bin/java 63 manual mode Press enter to keep the current choice[*], or type selection number:
In this case, look for the one with “/usr/lib/jvm/java-6-sun/jre/bin/java” in the Path column. Since “3” is “Sun Java” here, press “3” then enter, to switch the default java to Sun.
Installing the main body of Eclipse with full complement
Download Full complement package for Linux from OpenRTM Eclipse tools 1.0-RELEASE and implement it under workspace in the home directory (for example).
 % cd workspace
 % wget http://www.openrtm.org/pub/OpenRTM-aist/tools/1.0.0/eclipse342_rtmtools100release_linux_ja.tar.gz
 % tar xzf eclipse342_rtmtools100release_linux_ja.tar.gz
 % cd eclipse
If ./eclipse is booted without any changes the splash screen will be displayed, followed by an empty window, and a normal start up will not occur.
The following command line is therefore used for booting.
% ./eclipse -clean -vmargs -Dorg.eclipse.swt.browser.XULRunnerPath=/usr/lib/xulrunner-1.9.2.13/xulrunner
When this option is used to boot once or several times, it appears that booting can be accomplished with ./eclipse alone. Add a launcher for the custom application in the panel and set the command to /home/(user name )/workspace/eclipse/eclipse to boot Eclipse without using a terminal.
Set /etc/hosts
On RT System Editor of Eclipse, Name Server View may not become effective.
It is avoidable by commenting out the IPv6 item of /etc/hosts.
% sudo gedit /etc/hosts
Example: /etc/hosts
127.0.0.1 localhost
127.0.1.1 yourservername # (note: your host name)
- The following lines are desirable for IPv6 capable hosts
- ::1 localhost ip6-localhost ip6-loopback
- fe00::0 ip6-localnet
- ff00::0 ip6-mcastprefix
- ff02::1 ip6-allnodes
- ff02::2 ip6-allrouters
- ff02::3 ip6-allhosts
Grasp Plug-in
Grasp Plug-in provides two main functions; one is the grasp planning for multi-fingered hands and the other is the basic functions commonly used by other plug-ins. In the following, we will mainly explain the grasp planning function of this plug-in.
Basic Information
- Plug-in name: Grasp
- Dependency: No
- Applicable robot models: PA10, SmartPAL5, RH1, HRP-3, HRP-2 JRL
Planner Bar
By using the bar entitled "=Planner=", the grasping posture can be planned.
![]()
For more detailed information, please refer Planner Bar Help .
Tutorials
- We show an example of grasp planning for PA10 in Grasp Planning Tutorial.
- We also show the way of Introducing a new hand model.
Motion Planning
The Grasp Plugin is for obtaining an appropriate position for the gripper for the purpose of grasping and setting and does not take into consideration how the entire arm will be moved. Use the PRM plugin to formulate a motion plan for the arm that does not interfere with the surrounding environment. Refer to PRM plug-in for details.
Grasp Planning Algorithm
This plug-in uses a grasp planning algorithm where the bounding box models are used for both the hand grasping region and the object model. By using this plug-in, we can construct several grasping styles for multi-fingered hand such as the 3 fingered fingertip grasp, the 4 fingered fingertip grasp, and the enveloping grasp. Here, we call the bounding box expressing the grasping region as the Grasping Rectangular Convex (GRC). Also, we call the bounding box of the object model as the Obect Convex Polygon (OCP). By considering the geometrical relation between the GRC and the OCP, we can determine the approximate position/orientation of the palm. Then the final grasping posture is determined by using the random sampling of the palm position.
Also, we use the fast method for checking the force closure by using the ellipsoidal approximation of the friction cone. Here, since we also prepare the conventional method of force closure, you can use it. For more detailed information on the grasp planning algorithm, please see the references.
References
[1]Kensuke Harada, Kenji Kaneko, and Fumio Kanehiro, Fast Grasp Planning for Hand/Arm Systems Based on Convex Model, 2008 IEEE International Conference on Robotics and Automation, pp. 1162-1168, 2008.
[2]T. Tsuji, K. Harada, and K. Kaneko, Easy and Fast Evaluation of Grasp Stability by using Ellipsoidal Approximation of Friction Cone, Proc. of 2009 IEEE/RSJ Int. Conf. on Intelligent Robots and Systems,pp.1830-1837、2009.
[4]T. Tsuji, K. Harada, K. Kaneko, F. Kanehiro, and K. Maruyama, Grasp Planning for a Multifingered Hand with a Humanoid Robot, Journal of Robotics and Mechatronics, Vol.22 No.2, pp. 230-238, 2010.
Methodology for introducing a new robot model in graspPlugin
This section describes how to prepare for the grasp planning stage when a new robot is introduced. HRP2JRL is used as an example of a robot model.
(1) Edit the yaml file
Edit the file “graspPlugin/RobotModels/HRP2JRL/HRP2.yaml” in a similar manner to that shown below. The meaning of each entry is explained on the right, after the “%” sign.
 graspPluginSetting:
    name: HRP2 %Name of the Robot
    base: CHEST_JOINT1 %Base link used when IK is solved
    palm: RARM_JOINT5 %Wrist link used when IK is solved
    fingerEnds:    [ RHAND_JOINT1, RHAND_JOINT4 ] %Finger-tip links
    prehensionList: [ prehension ] %File with reference postures for grasping (prehension.pos, prehension.prm), Multiple reference postures can be specified.
    armStandardPose: [0, 0, 0, -1.57, 0, 0] %Reference posture of the arm when IK is solved by iterative calculations(The Joint angle from the base to palm)
    fingerOpenPose: [0.78, -0.78, 0.78, -0.78, 0.78, -0.78] %Pose with the fingers opened to the maximum possible extent.
    interlink:    [ [ RARM_JOINT6, 1.0 , RHAND_JOINT0, -1.0, RHAND_JOINT1, 1.0 ],[RHAND_JOINT2, -1.0, RHAND_JOINT3, 1.0, RHAND_JOINT4, -1.0]]%Interlocking link
    GrasplotPluginDir: Plugin % Name of the directory that contains the program which solves a specific ID.
The interlink definition is very important here. The HRPJ2RL Robot possesses two hands and six links and moves by interlocking links. This entry defines the aforementioned interlocking.
(2) Edit the PRM file
Next, the “prehension.prm” and “prehension.pos files” are specified. These files are stored in the “graspPlugin/RobotModels/HRP2JRL/data” path.
Note:
The “prehension.prm” file contains descriptors that hold parameters related to the grasp types (3-fingered fingertip grasp, 4-fingered fingertip grasp, enveloping grasp, etc.) and the “prehension.pos” file contains the standard postures while grasping in any of the above grasp types.
(2-1) prehension.prm
The entries between the [START] and [END] of this file, for example, are filled as shown below.
    Reference_Motion prehension
    Finger0Contact    0 1 0
    Finger0Comp        0 0 0
    Finger0Close    0.01 -0.01 0.01
    Finger1Contact    0 1 0
    Finger1Comp        0 0 0
    Finger1Close    -0.01 0.01 -0.01
    GRCdes_Position    0.0 0.0 -0.19
    GRCmax_Position    0.0 0.0 -0.30
    GRCmin_Position 0.0 0.0 -0.19
    GRCdes_Rpy    -1.57 0 0
    GRCmax_Rpy    -1.57 0 0
    GRCmin_Rpy    -1.57 0 0
    GRCdes_Edges     0.05 0.05 0.05
    GRCmax_Edges     0.30 0.30 0.10
    GRCmin_Edges     0.01 0.01 0.01
    Max_Load     1.0
    Min_Load     0
Each entry is explained below.
- Finger[i]Contact
- Defines which i-th link of the finger contacts the object. In the case of the H2P2JRL model, only the second link of both the 0th and 1st fingers would make contact with the object.
- Finger[i]Comp
- Defines which joint should be used to compensate for the link position while bringing the j-th link (of the i-th finger) into contact with the object. In the case of the H2P2JRL model, the 0th joint is generally used.
- GRC[max,des,min]_Position, GRC[max,des,min]_Rpy, GRC[max,dex,min]_Edges
- The rectangular cuboid that specifies the grasp type. This defines the position, posture, and side length of the GRC (Grasping Rectangular Convex). The figures below show examples of GRCmax and GRCdes. It should be noted that GRCmax specifies the range for “random sampling” of the object positions. GRCdes specifies the desired grasp type. Furthermore, the hand approaches the object in the GRC coordinate system along the y axis, and so the posture should be decided accordingly.
- [Max, Min]_Load
- Specifies the maximum and minimum weight of the grasp object in kg.
(2-2)prehension.pos
For example, the entries in this file are as shown below.
0 0.78 -0.78 0.78 -0.78 0.78 -0.78
The first 0 can be any arbitrary number, but the numbers after that specify the finger joint angles in the same order as specified in the VRML.
With this, the setup for using the Grasp Plug-in is complete.
 GRCmax
 GRCdes
PRM plug-in
In this section, the operation of the PRM plug-in—an arm motion plug-in built into graspPlugin—is explained.
Basic Information
Plug-in name: PRM
Dependent plug-in: Grasp
Path Planner bar
The Path Planner bar starts with the title “= PathPlan =” at the center of the fifth level of the Choreonoid toolbar. Set the robot, object, and environment using the Planner bar (refer to the Operation of Grasp Plug-in), then click on the Start tool button to prepare the motion plan.
Tutorial
See Motion Plan Tutorial.
Program structure
- The parameters for the path plan are set in SBLinterface.cpp, with the constructor of class SBL. Refer to the mpk manual for details on these parameters.
- AdaptSegmentChecker is not supported at the present time.
- The class for handling the model of OpenHRP, mpkRobots, is added to the original mpk to allow mpkConfigChecker to support the interference checker of OpenHRP.
- For the aspect of change in the algorithm itself, an operation to reduce the number of milestones have been added to mpkPathSmoother.
Motion planning algorithm
The PRM plugin formulates a motion plan for the arm to reach the target stance the initial stance, while avoiding any interference from the environment. This plugin was ported to graspPlugin from the motion planning algorithm used in the Motion Planning Kit (MPK) [1], which was developed by Professor J.C. Latombe’s group and others at Stanford University. The algorithm itself uses the Single Query Bi-directional Lazy-collision checking (SBL) probabilistic roadmap planner—a derivative of PRM.
References
[1] http://robotics.stanford.edu/~mitul/mpk/
[2] G. Sanchez and J.C. Latombe, “A Single-Query Bi-Directional Probabilistic Roadmap Planner with Lazy CollisionChecking”, Int. Symposium on Robotics Research (ISRR'01), November 2001. Published in Robotics Research: The Tenth Int. Symp., R.A. Jarvis and A. Zelinsky (eds.), Springer Tracts in Advanced Robotics, Springer, pp. 403–417, 2003.
http://robotics.stanford.edu/~latombe/papers/isrr01/spinger/latombe.pdf
GripperManipulation Plug-in
GripperManipulation plug-in provides the pick-and-place motion planning for robot systems having parallel grippers. As for the grasp planning, we newly developed the grasp planner specialized for parallel grippers. The feature of this grasp planner is that the grasping posture can be calculated in real-time. Also, since we do not use the bounding box models, we can easily apply this method for complex shaped objects.
Basic Information
- Plug-in name: GripperManipulation
- Dependent plug-in: Grasp
- Applicable robot models: PA10, HIRO
Planner Bar
If we introduce this plug-in, the Start button of Planner bar will be used for the grasp planning function of "this" plug-in "NOT" Grasp plug-in's one. Also, we have "INTENTION" tool bar. This bar is used to specify a part of the grasped object.
Tutorials
- To use this plug-in, please read国際ロボット展デモマニュアル(In Japanese). With this document, we also use the VisionTrigger plug-in and the RoboInterface plug-in along with the GripperManipulation plug-in.
- To newly introduce an object model, please read 新しい対象物モデルの導入方法(In Japanese).
Planning Algorithm
To explain.
References
[1] K. Harada, T. Tsuji et al, "Grasp Planning for Parallel Grippers Considering Flexibility on its Grasping Surface", Proc. of IEEE Int. Conf. on Robotics and Biomimetics, 2011.
Modifying GripperManipulation Plugin to be an RT component
Attach a “receptacle” for the RT component to the plugin referred to as Choreonoid/extPlugin/graspPlugin/GripperManipulation.
Details on the original GripperManipulation
This is a graspPlugin plugin for the grasping plan intended for twin arm robots, with the following file configurations:- CMakeLists.txt: cmake definition file
- GripperManipulationMain.cpp: Choreonoid plugin ManipPlugin class source
- ManipBar.cpp: Choreonoid tool bar ManipBar class source
- ManipBar.h: Choreonoid tool bar ManipBar class header
- ManipController.cpp: grasping plan controller ManipController class source
- ManipController.h: grasping plan controller ManipController class header
- PRM: grasping plan data file directory
In order to make the structure of the program easier to see, GripperManipulationMain.cpp is renamed ManipPlugin. In addition, CMakeLists.txt is also modified and verified to ensure that it can be compiled.
Preparing the RT components skeleton with RTC Builder
In the preliminary preparation, the rtc directory is prepared under GripperManipulation, while GraspController.idl is also placed there.Run Eclipse and set a new Eclipse project (a dummy project) in this rtc directory. Select “C++ Project” in the Wizard selection and set the respective items in the following manner.
- Project name: GraspControllerRTC
- Location (user’s working directory): /Choreonoid/extplugin/graspPlugin/GripperManipulation/rtc
- Project type: Executable - Empty Project
Press the “Finish” button and a dialog box with the prompt, "Open C++ Perspective?" will be displayed. This can be closed.
The preliminary preparations are now complete. Open the RTC Builder Perspective with Eclipse. Click on the RT icon to open the RtcBuilder View and set the necessary information for each tab.
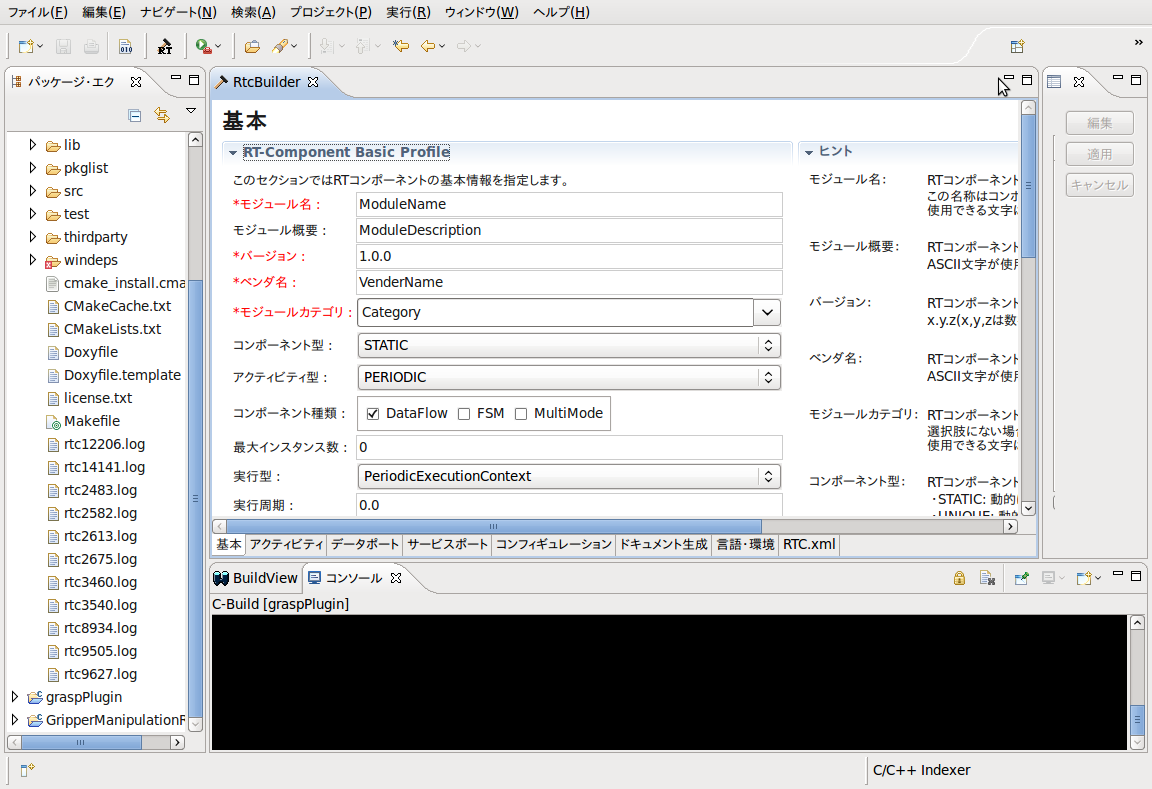
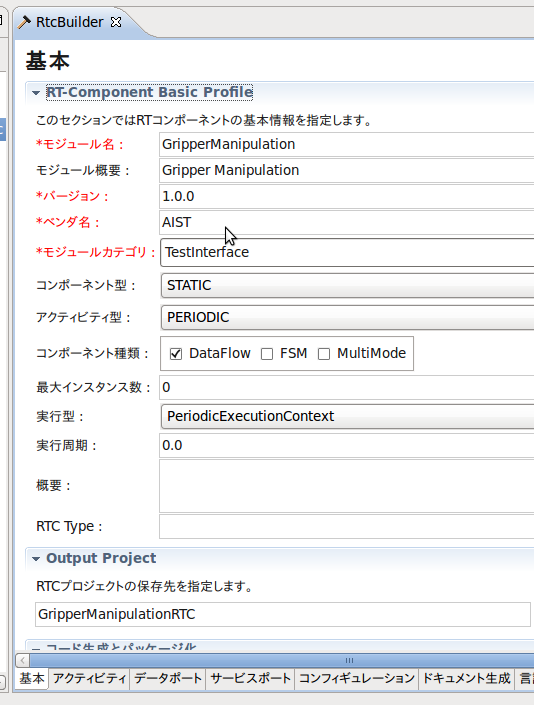
“Basic” tab
- Module name: GripperManipulation
- Module summary: Gripper Manipulation
- Vendor name: AIST
- Module category: TestInterface
- Output Project GripperManipulationRTC (select the project that was prepared earlier).
Other items can be left with the default settings.
"Language and environment" tab
Select C++.
“Service port” tab
Press the Add Port button. A port called “sv_name” is created. Click on it with the mouse and display the Profile Setting screen on the right side. Set the port name to PlanStartPort and then press the Add Interface button to set the following information to the newly created interface.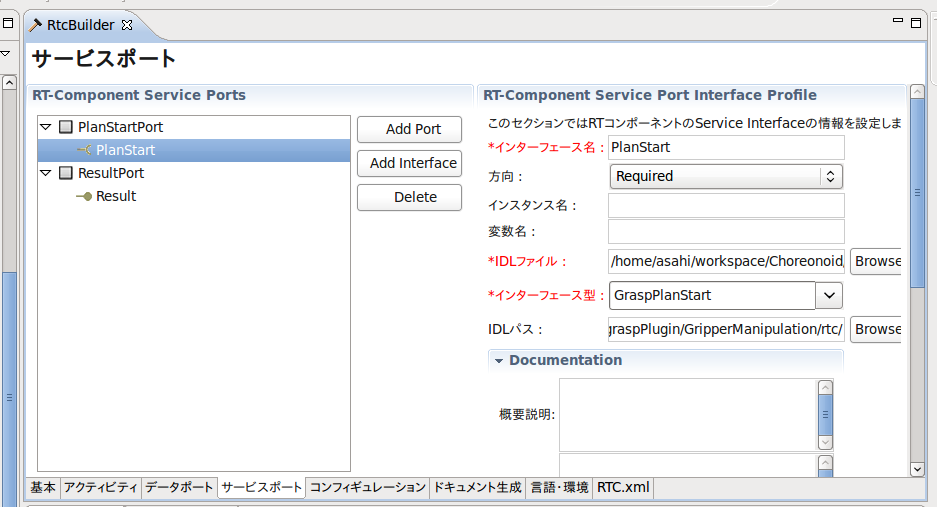
- Interface name: PlanStart
- Direction: Required
- IDL file: /home/asahi/workspace/Choreonoid/extplugin/graspPlugin/GripperManipulation/rtc/GraspController.idl
- Interface type: GraspPlanStart (selectable item)
- IDL path: /home/asahi/workspace/Choreonoid/extplugin/graspPlugin/GripperManipulation/rtc/
- Interface name: Result
- Direction: Provided
- IDL file: /home/asahi/workspace/Choreonoid/extplugin/graspPlugin/GripperManipulation/rtc/GraspController.idl
- IDL path: /home/asahi/workspace/Choreonoid/extplugin/graspPlugin/GripperManipulation/rtc/
Generate codes
The settings for the RTC Builder are now complete. Open the Basic tab again and press the Generate Code button to create the following files in Choreonoid/extPlugin/graspPlugin/GripperManipulation/rtc:- GraspControllerSVC_impl.cpp
- GraspControllerSVC_impl.h
- GripperManipulation.conf
- GripperManipulation.cpp
- GripperManipulation.h
- GripperManipulationComp.cpp
- GripperManipulationComp_vc8.vcproj
- GripperManipulationComp_vc9.vcproj
- GripperManipulation_vc8.sln
- GripperManipulation_vc8.vcproj
- GripperManipulation_vc9.sln
- GripperManipulation_vc9.vcproj
- Makefile.GripperManipulation
- RTC.xml
- copyprops.bat
- user_config.vsprops
At this point, a series of settings are stored in RTC.xml and saved together. When changing the settings of the RT components, the import function of the Profile in the Basic tab of the RTC Builder can be used to recall these settings.
Compile rtc
Open the terminal, move to the GripperManipulation/rtc directory, then execute the following command.
% omniidl -bcxx GraspController.idl
GraspController.hh and GraspControllerSK.cc are generated. Next, execute make. It is necessary to specify the Makefile.
% make -f Makefile.GripperManipulation
This generates GraspControllerSkel.cpp, GraspControllerStub.cpp, GraspControllerSkel.h, and GraspControllerStub.h (these do not go through the compilation process but can continue on unchanged).
Prepare the bridging class for the Choreonoid plugin and the RT components
Copy GraspRtcController.h and GraspRtcController.cpp from graspPlugin/GraspConsumer to GripperManipulation, then edit them.
Since it may be confused with ManipController.h(cpp), the file name is changed to ManipRtc.h(cpp).
Sample patch
A patch file that edits a series of files all at once was prepared as a sample.
% svn co -r131 http://subaru.ait.kyushu-u.ac.jp/svn/grasp-plugin/trunk/graspPlugin/GripperManipulation
After checking out revision 131 of GripperManipulation, perform settings for RTC Builder and prepare ManipRtc.h(cpp), then download the patch file GripperManipulation_patch.txt, then execute the following command.
% patch -p0 < GripperManipulation_patch.txt
This applies all changes simultaneously and the build can be performed immediately.
The following is a summary of the changes made using the patch file.
ManipRtc.h(cpp)
Changes the class name to ManipRtc (the refactoring function of Eclipse is useful, but care must be taken to ensure that the source, GraspConsumer, is not changed also!).Change the part that includes GraspConsumer.h, GraspController.hh, and GripperManipulation.h under rtc. Change the type of comp from GraspConsumer * to ::GripperManipulation *. The parts that are the arguments of graspPlanResult and have become const GraspPlanResult, are all changed to ::GraspPlanResult. The identifier of the include guard is also changed to match the header and becomes MANIPRTC_H.
ManipPlugin.cpp
Add codes to start the RT components in the ManipPlugin::initialize method.
    virtual bool initialize() {
      //Robotics::SceneBodyManager* manager = Robotics::SceneBodyManager::instance();
      grasp::GraspController::instance(ManipController::instance());
      ManipRtc::instance()->RtcStart();
      //manage(manager->addSceneBodyFactory(create));
rtc/GripperManipulation.h
Change the class of grasp::ManipRtc to a friend class of GripperManipulation. using namespace RTC;
namespace grasp {
class ManipRtc;
}
...
class GripperManipulation
: public RTC::DataFlowComponentBase
{
public:
friend class grasp::ManipRtc;
rtc/GraspControlerSVC_impl.cpp/h
Since RTCBuilder outputs the arguments of the IDL data type as CORBA, but omniidl outputs the same data as ::CORBA, compiler errors occur when the types are different. For this reason, a declaration for the CORBA namespace-type argument is rewritten to ::CORBA, in order to match the output of omniidl. In addition, with regard to the argument for the method of GraspPlanResultSVC_impl class, the declaration for the GraspPlanStart name space-type argument is rewritten to GraspPlanResult (this may be a bug in RTCBuilder).
CMakeLists.txt
- set(rtc-dir ./rtc) is added
- include_directories(${rtc-dir}) is added
dir}/GraspControllerSkel.cpp are added to sources.
- ManipRtc.h, ${rtc-dir}/GraspController.hh, ${rtc-dir}/GraspControllerSVC_impl.h, ${rtcdir}/GripperManipulation.h, ${rtc-dir}/GraspControllerSkel.h, ${rtc-dir}/GraspControllerStub.h are added to the headers.
- -fPIC -O2 -I/usr/include -I/usr/include/rtm/idl -I. is added to add_definitions.
- uuid dl pthread omniORB4 omnithread omniDynamic4 RTC coil is added to target_link_libraries.
- Lines elseif(MSVC) to endif(UNIX), which are paired with if(UNIX), are deleted.
Build and verify movements
In the first instance, execute ccmake in the Choreonoid directory.
% ccmake.
Add GripperManipulation to GRASP_PLUGINS and execute configure and generate to prepare Makefile. Execute make and if lib/choreonoid-0.9/libCnoidGripperManipulationPlugin.so is built successfully, verify the movements.
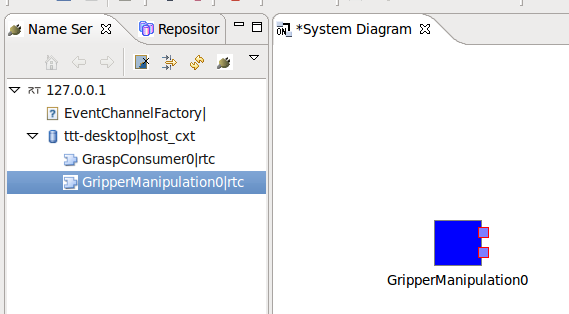
Boot Choreonoid and the RT System Editor, then verify that GripperManipulation0|rtc exists under (host name)| host_cxt, which is under 127.0.0.1 in the NameServer tab. If this can be dragged and dropped into the System Diagram, the process has been completed successfully.
(However, if nothing happens when this is linked to other RT components, then continue on to the Section on Modify GripperManipulation to RT components and implement).
GraspConsumer Plug-in
This section explains how to use the GraspConsumer plug-in which is a plug-in of OpenRTM consumer of the "grasping motion planning module" of the NEDO project.
Basic Information
- Plug-in name: GraspConsumer
- Dependent plug-in: Grasp
- Applicable robot models: PA10 (Confirmed that it also works for HRP-3 and SmartPAL)
Grasp Planning Algorithm
We distribute the grasping motion planning module for the NEDO project. What this module, we first prepare a set of the grasping posture with respect to the object coordinate system as a data file. Then, when performing the grasp planning, we search for this file and determine the grasping posture. GraspConsumer plug-in is a consumer of this grasping motion planning module.
GraspRTC Bar
GraspRTC Bar is like;
![]()
For the detailed information, please see GraspRTC Bar Help.
Tutorial
Please see Grasp Motion Planning Tutorial by GraspConsumer Plug-in.
Grasping motion planning module
As for the detail of this RT module please see the following| English | Japanese |
|---|---|
| GraspComsumer System Description | システム仕様書 |
| GraspConsumer Environment Configuration Specification | 環境仕様書 |
| GraspConsumer Operation Procedure | 操作マニュアル |
GraspComsumer System Description
This document summarizes the system specifications for “The hand grasp motion planning system” constructed during “The Research and development on robotic intelligence for in-house life support robots” conducted as part of the “Development Project for Intelligent Technologies for Next-Generation Robots.”
Relevant documents
The relevant documents are listed in the table below.| No. | Document name | Remarks |
|---|---|---|
| 1 | Hand grasp motion planning behavioral specification | Description of the “Hand grasp motion planning” behavioral specification (Functional) |
| 2 | Hand grasp motion planning environment configuration specification | Description of the “Hand grasp motion planning” environment configuration specification |
| 3 | Hand grasp motion planning operating procedure | Description of the “Hand grasp motion planning” operating procedure |
Target audience
This document targets developers of robotic systems that use RT Middleware (RTM) and RT Components (RTC) and assumes that they possess a general knowledge of RTM and RTC tools.
OpenRTM-aist Official Website:
http://www.openrtm.org/
Overview
Objective
To provide RT components that perform grasp motion planning for a known target position in in-house life support robots used in hospitals and nursing homes to perform daily operations such as the handing over or sending away of daily necessities.
System overview
This system is a grasp motion planning module that calculates the “ approach position & attitude” and the “hand grasp position & attitude” from (a) the measured position & attitude of the object (that is to be grasped) through visual modules and (b) previously stored information on the shape of the object.
The schematic diagram of the system is given below.
[inline:diagram.png=Figure 2-1. Schematic diagram of the hand grasp motion planning system]
Figure 2-1. Schematic diagram of the hand grasp motion planning system
[inline:planning_results.png=Figure 2-2 Example of grasp motion planning results]
Figure 2-2 Example of grasp motion planning results
System Specification
Module configuration
In the development of robotic intelligence for in-house life support robots, the robot receives instructions via voice interactions and acquires information on the position of the manipulating object through Town Management Systems (TMS) and visual measurements. Based on the above, the robot carries out grasp motion planning using a grasp motion planning RTC. The robot performs grasping operations by moving and coordinating its entire body based on the above planning.
Module specifications
Grasp motion planning RTC
1) Outline
Performs hand grasp motion planning based on the input.
2) Basic information
| Classification | RTC |
|---|---|
| Provider | National Institute of Advanced Industrial Science and Technology (AIST) |
| Operating System | Ubuntu 10.04 |
| RT Middleware | OpenRTM-aist-1.0.0-RELEASE(C++) |
| Development language | C++ |
| Dependent libraries | |
| - - |
| Port name | Connected to (RTC) | Remarks |
|---|---|---|
| PlanStartPort | “Operation planning execution” module | Receives information on the target object for grasping |
| ResultPort | “Operation planning execution” module | Transmits grasp motion planning |
Details of the RTC configuration and functions making up this system are given below.
[inline:grasp_motion_planning_RTC_connection.png=Figure 3-1. Connection configuration for grasp motion planning RTC]
Figure 3-1. Connection configuration for grasp motion planning RTC
I/F between the modules
Input/output specification
In order to implement grasp motion planning, specifications for the transmission between the operation execution RTCs are determined by viewing from the grasp motion planning RTC side, as given below.
GraspPlanningStart: Input information on the target object.| Input/Output | Variable type | Variable name | Comments |
|---|---|---|---|
| in | unsigned long | ObjId | Code number of the object to be grasped |
| in | DblSequence3 | objPos | Position of the object to be grasped |
| in | DblSequence9 | objOri | Attitude of the object to be grasped |
| out | unsigned long | state | Success (0) or Failure (1) |
| Input/Output | Variable type | Variable name | Comments |
|---|---|---|---|
| In | DblSequence3 | GraspPos | Grasp Position |
| In | DblSequence9 | GraspOri | Grasp Attitude |
| In | DblSequence3 | ApproachPos | Approach Position |
| In | DblSequence9 | ApproachOri | Approach Attitude |
| In | double | angle | Opening and Closing angles of the Gripper |
| In | unsigned long | state | 1 when grasp pattern exists |
| out | unsigned long | isContinue | Takes the value of 1 while Continue=Yes |
Operating sequence
The operating sequence in grasp motion is given below.
[inline:grasp_motion_planning_sequence_diagram.png=Figure 3-2. Grasp motion planning sequence diagram]
Figure 3-2. Grasp motion planning sequence diagram
GraspConsumer Operation Procedure
Introduction
Scope
This document describes the operating procedures for “The hand grasp motion planning system” constructed during “The Research and development on robotic intelligence for in-house life support robots” conducted as part of the “Development Project for Intelligent Technologies for Next-Generation Robots.”
Relevant documents
The relevant documents are listed in the table below.
| No. | Document name | Remarks |
|---|---|---|
| 1 | Hand grasp motion planning behavioral specification | Description of the “hand grasp motion planning” behavioral specification (Functional) |
| 2 | Hand grasp motion planning system specification | Description of the “hand grasp motion planning” system specification |
| 3 | Hand grasp motion planning environment configuration specification | Description of the “hand grasp motion planning” module’s environment configuration |
Target audience
This document targets developers of robotic systems that use RT Middleware (RTM) and RT Components (RTC) and assumes that they possess a general knowledge of RTM and RTC tools.
OpenRTM-aist Official Website
http://www.openrtm.org/
Software Installation
This module operates on Ubuntu10.04. OpenRTM-aist-1.0.0-RELEASE installation is a prerequisite for the module’s operation. Details on libraries, etc. are specified in the environment configuration specification. This document describes the installation procedure.
Standard operating environment
OpenRTM-aist-1.0.0 RELEASE (C++)
Install the RT middleware required for executing RTC, which is written in C++.
Use the installer script for Ubuntu. Open the C + + 1.0.0 version -RELEASE distribution page: http://www.openrtm.org/openrtm/ja/node/849 (as of 21st April, 2011) from the “OpenRTM-aist” download page. Download the batch installation script pkg_install_ubuntu.sh for Ubuntu from the list of Linux packages and run the same.
| Installer | Program to be installed |
|---|---|
| pkg_install_ubuntu.sh | Batch Installation |
Compilation
Unzip and extract the “CGraspPlanComp.tar” files. Taking the generated “GraspPlan20100623” folder as the current directory, execute the following command.
% make
Execution
Successful operation requires a component for acquiring information on the object's position and delivering it to this component. This module’s execution sequence is described below.
Invoking the module
Taking the extracted “GraspPlan20100623” folder as the current directory, execute the following command.
% ./GraspPlannerComp
Input/Output Information
Send “grasp planning control orders” to Hand RTC using “GraspPlanningStart”. Acquire grasp motion patterns using “GraspPlanningResult.”
The inputs to “GraspPlanningStart” are the (i) Object ID and (ii) position & attitude measured by the visual sensors.
The output obtained from “GraspPlanningResult” are the hand position & attitude, approach position & attitude, opening and closing angles of the gripper, and presence or absence of a grasp pattern.
 void GraspPlanningStart (in unsigned long ObjId,
                          in DblSequence3 objPos,
                          in DblSequence9 objOri,
                          out unsigned long state);
| Input/Output | Variable type | Variable name | Comments |
|---|---|---|---|
| in | unsigned long | ObjId | Code number of the object to be grasped |
| in | DblSequence3 | objPos | Position of the object to be grasped |
| in | DblSequence9 | objOri | Attitude of the object to be grasped |
| out | unsigned long | state | Success (0) or Failure (1) |
 void GraspPlanningResult (in DblSequence3 GraspPos,
                           in DblSequence9 GraspOri,
                           in DblSequence3 ApproachPos,
                           in DblSequence9 ApproachOri,
                           in double angle,
                           in unsigned long state,
                           out unsigned long isContinue );
| Input/Output | Variable type | Variable name | Comments |
|---|---|---|---|
| In | DblSequence3 | GraspPos | Grasp Position |
| In | DblSequence9 | GraspOri | Grasp Attitude |
| In | DblSequence3 | ApproachPos | Approach Position |
| In | DblSequence9 | ApproachOri | Approach Attitude |
| In | double | angle | Opening and Closing Gripper angles |
| In | unsigned long | state | 1 when grasp pattern exists and 0 when it does not |
| out | unsigned long | isContinue | Success (0) or Failure (1) |