Choreonoid and HiroNXProvider
HiroNXProvider and HiroNXGUI
It is possible to transmit grasp planning from Choreonoid and to “Start/Stop” HIRO from the HiroNXGUI by running the HiroNXProvider function on HIRO.
Starting Choreonoid
HIRO operates by sending the grasp planning generated by Choreonoid to the HiroNXProvider.
 % cd ~/src/Choreonoid
 % bin/choreonoid extplugin/graspPlugin/GripperManipulation/project/worldexpo.cnoid
worldexpo.cnoid can be read through this operation; HIRO, the table, and parts can be seen within the Choreonoid space.
Several RT components included in Choreonoid are simultaneously invoked.
 % rtls localhost/dinobot.host_cxt/
 HIROController0.rtc GripperManipulation0.rtc GraspConsumer0.rtc
The Consumer RTC, HIROController0.rtc, is used here.
Starting the HiroNXProvider
The HiroNXProvider is an RT component that provides the API for SETUP, CALIBRATION, SERVO ON/OFF, and SHUTDOWN. In addition, it provides the API for directly manipulating the angle of each joint.
 % cd ~/asahi/HiroNXProvider
 % ./HiroNXProvider.py
HiroNXProvider0.rtc, located in the localhost/dinobot.host_cxt/ directory, can be used here.
In addition, though the HiroNXProvider is an RTC provider written in Jython, /opt/grx/bin/hrpsyspy is the interpreter that is actually used.
Starting HiroNXGUI
HiroNXGUI is a tool that uses the API provided by the HiroNXProvider to operate HIRO via the GUI. In addition, HIRO can be operated by directly specifying the angle of each joint.
 % cd ~/asahi/HiroNXGUI
 % ./WxHiroNXGUI.py
With this, the GUI is invoked.
HiroNXGUI is a consumer RTC that runs on Python.
HiroNXGUI0.rtc, located in the localhost/dinobot.host_cxt/ directory, can be used here.
Connection of RT components
There are two service ports, known as the HiroNX port and the HIRO Port, between the three RTCs — HIROController0.rtc, HiroNXProvider0.rtc, and HiroNXGUI0.rtc
HIROController0.rtc <-> HiroNXProvider0.rtc
HiroNXGUI0.rtc <-> HiroNXProvider0.rtc
The HiroNX ports and HIRO ports are connected in this combination and activated.
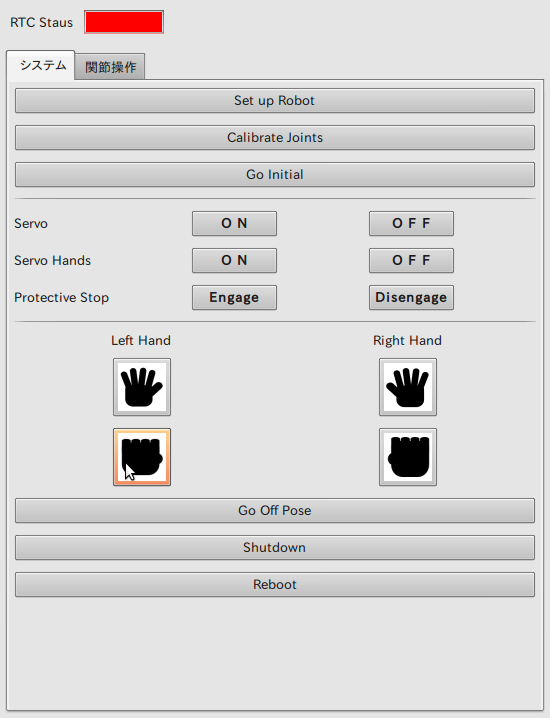
Operation of HiroNXGUI
The operation of HiroNXGUI is similar to that of gui.py (Refer to the HiroNX operating procedures).
On activation, the RTC Status field turns green.
Setup procedure for HIRO
- 1. Setup Robot
- Perform the required connections with HIRO.
- 2. Calibrate Joint L
- Perform the required joint adjustments (Switch the main servo “ON”).
- 3. Servo Hands ON
- Switch the servo hand “ON.”
- 4. Go initial
- Switch to the initial posture.
Open hand — closed fist operations can be achieved by using the “Open Hand” and “Close Hand” buttons, respectively.
In the “Joint-operation tab,” it is possible to set the angle of each of the servo motors present in the left and right hands, arms, and the body, by means of a textbox. The posture of HIRO changes with a click of the “GO” button after completing the angle setup of all the servo motors. The angles of all the servo motors are reset to their initial posture values on clicking the “Reset” Button.
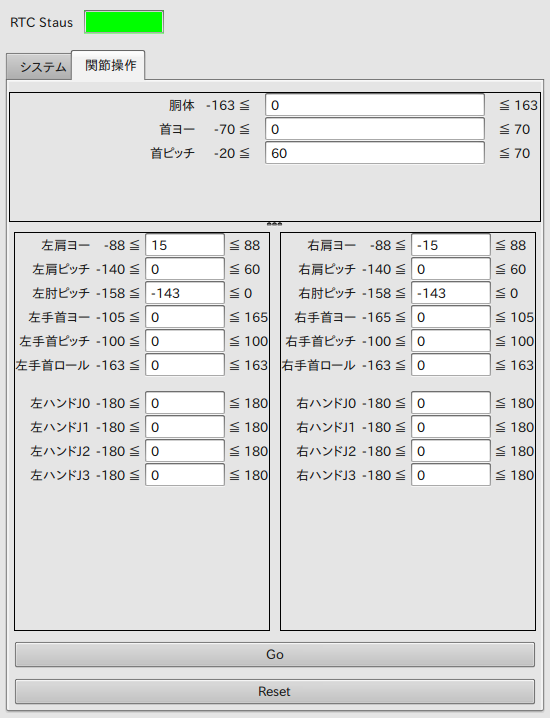
| Japanese | English |
| 胴体 | Body |
| 首ヨー | Head Yaw |
| 首ピッチ | Head Pitch |
| 左肩ヨー | Left Shoulder Yaw |
| 右肩ヨー | Right Shoulder Yaw |
| 左肩ピッチ | Left Shoulder Pitch |
| 右肩ピッチ | Right Shoulder Pitch |
| 左肘ピッチ | Left Elbow Pitch |
| 右肘ピッチ | Right Elbow Pitch |
| 左手首ヨー | Left Elbow Yaw |
| 右手首ヨー | Right Elbow Yaw |
| 左手首ピッチ | Left Wrist Pitch |
| 右手首ピッチ | Right Wrist Pitch |
| 左手首ロール | Left Wrist Roll |
| 右手首ロール | Right Wrist Roll |
| 左ハンド | Left Hand |
| 右ハンド | Right Hand |
Transmission of grasp planning from Choreonoid
After specifying a palette by holding Ctrl and left-clicking, choose the “Grasp” option of the “=Planner=Toolbar" to create grasp planning. The HIRO posture transition will be created on clicking the “Start” option of the “PathPlan=Toolbar.” More data are transmitted to HIRO after confirming through the use of animation that there is no problem with the HIRO posture. Please press the “Move” button on the “=Interface=Toolbar.”
Termination procedure for HIRO
- 1. Go off Pose
- Switch to Standby Pose.
- 2. Servo Hands OFF
- Switch OFF the Hand servos.
- 3. Servo OFF
- Switch OFF the Body servos.
- 4. Shutdown
- Shutdown the HIRO computer.