HiroNXGUI
HiroNXGUI Startup
Start the computer terminal and navigate to the directory where HiroNXGUI is installed. Then, type the following command.
% ./WxHiroNXGUI.py
A GUI similar to the one shown below will be displayed.
Connecting RT components
The two pairs of ports used by HiroNXGUI (i.e., the HiroNX ports and the HIRO ports) are connected to the HiroNXProvider using the RT System Editor known as Eclipse, rtcon commands, etc. When the RT System Editor is used, the upper port pair is connected to the lower port pair. (In the illustration, HiroNXGUI is at the top left and the HiroNXProvider is at the bottom right.)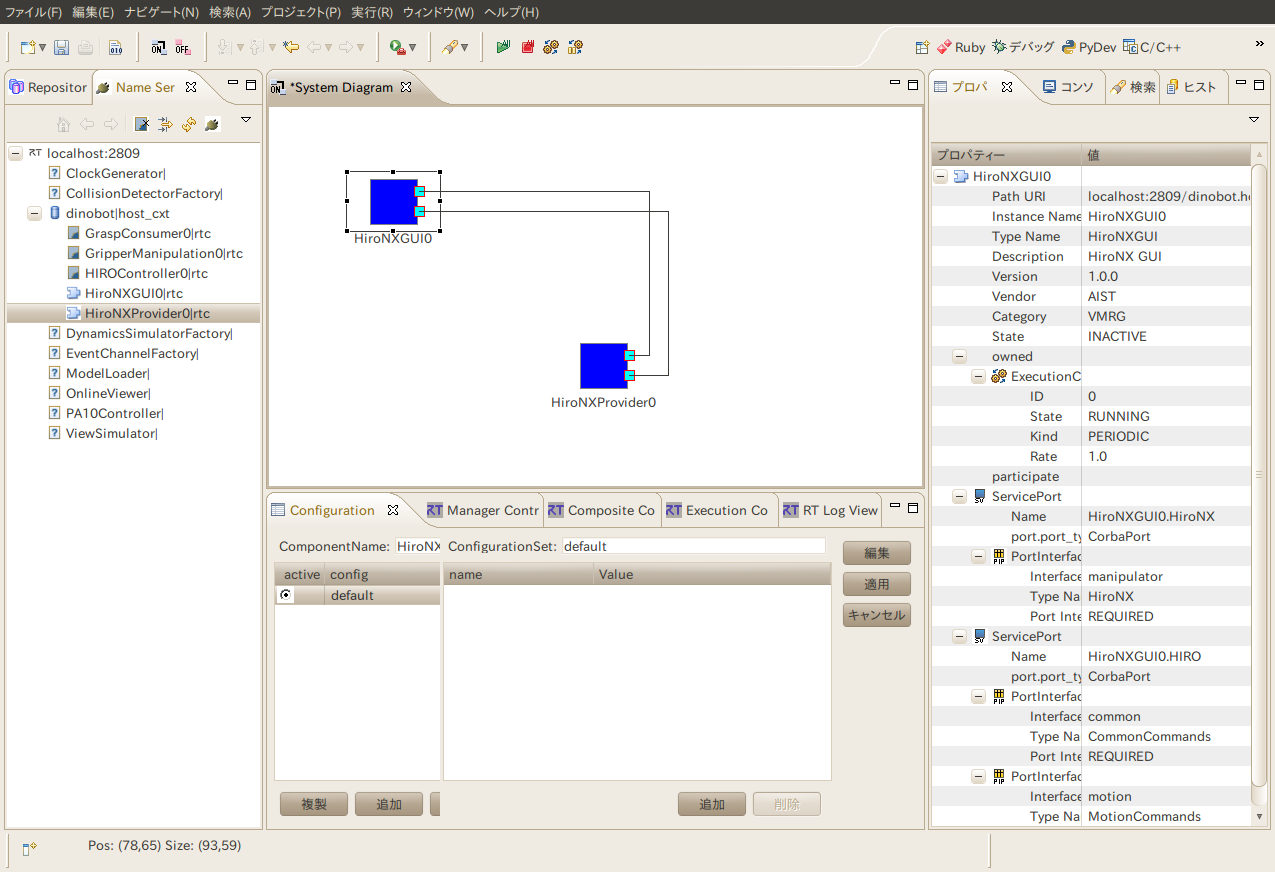
The following command lines are used when connecting by rtcon (localhost/vision.host_cxt varies depending on the execution environment).
 % rtcon localhost/vision.host_cxt/HiroNXGUI0.rtc:HIRO localhost/vision.host_cxt/HiroNXProvider0.rtc:HIRO
 % rtcon localhost/vision.host_cxt/HiroNXGUI0.rtc:HiroNX localhost/vision.host_cxt/HiroNXProvider0.rtc:HiroNX
 % rtact localhost/vision.host_cxt/HiroNXGUI0.rtc localhost/vision.host_cxt/HiroNXProvider0.rtc
Using HiroNXGUI
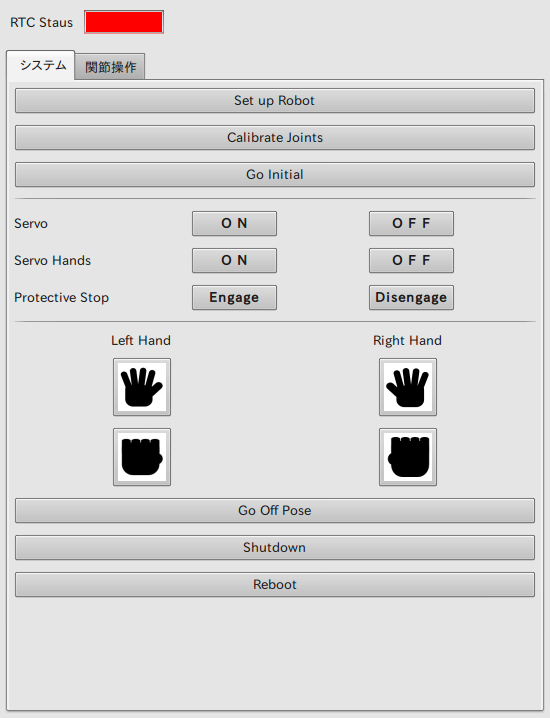
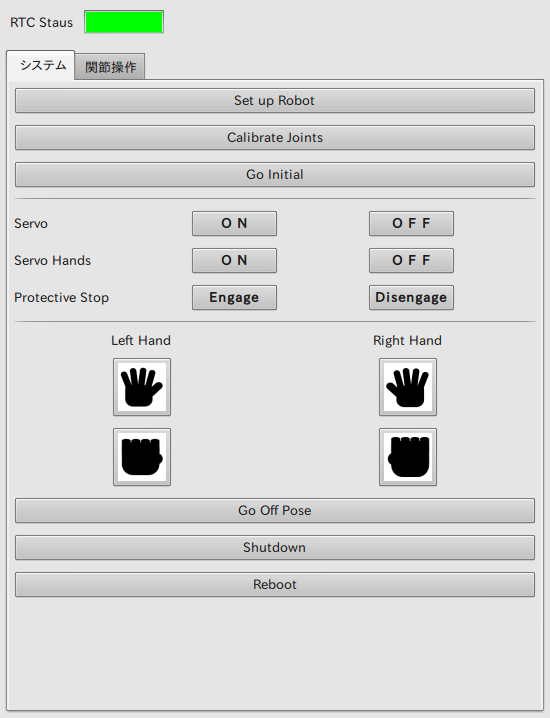
HiroNXGUI has two tabs and HIRO is controlled by either button or slider operations. The above RTC Status changes from RED to GREEN on activation. (However, this may not necessarily be related to the HiroNXProvider).
System tab
The top button is used to activate HIRO. The buttons should be pressed from top to bottom in the following order:
Set up Robot → Calibrate Joints → Go Initial. The “ON” button of Servo Hands is pressed after switching to the initial pose.
- Setup Robot
- Activate HIRO.
- Calibrate Joints
- Calibrate the joints.
- Go Initial
- Switch to the initial pose.
- Servo ON/OFF
- Switch corresponding to the robot body servos.
- Servo Hands ON/OFF
- Switch corresponding to the hand servos.
- Protective Stop Engage/Disengage
- Left Hand (Open Hand Icon)
- Open left hand.
- Left Hand (Grasping Hand Icon)
- Close left hand.
- Right Hand (Open Hand Icon)
- Open right hand.
- Right Hand (Grasping Hand Icon)
- Close right hand.
First, switch to the Standby pose using the “Go Off Pose” button. Next, press the Servo Hands “OFF” and Servo “OFF” buttons on the top to stop the servos. After this, the power supply to HIRO will be cut off when the “Shutdown” button is pressed. The HiroNXGUI program will be terminated and the Vision network will be cut off.
- Go Off Pose
- Switch to Standby Pose.
- Shutdown
- Cut off the power supply to HIRO and terminate HiroNXGUI.
- Reboot
- Restart HIRO.
Joint-operation tab
Textboxes are provided in this tab for directly manipulating the joint angles of HIRO.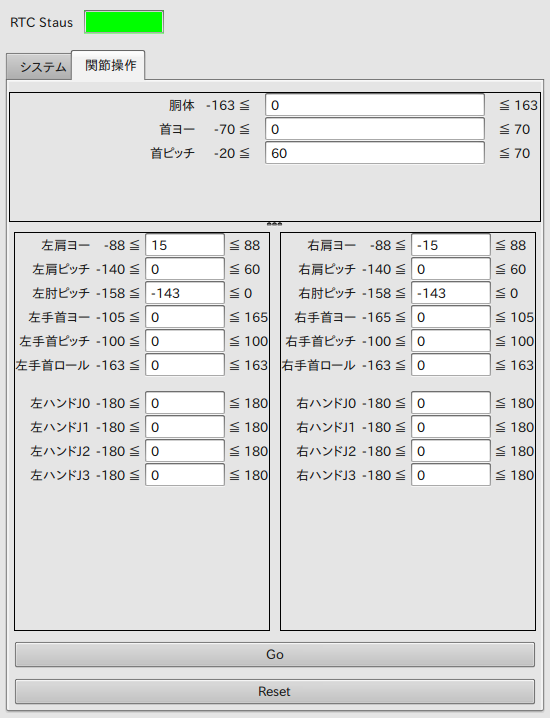
| Japanese | English |
| 胴体 | Body |
| 首ヨー | Head Yaw |
| 首ピッチ | Head Pitch |
| 左肩ヨー | Left Shoulder Yaw |
| 右肩ヨー | Right Shoulder Yaw |
| 左肩ピッチ | Left Shoulder Pitch |
| 右肩ピッチ | Right Shoulder Pitch |
| 左肘ピッチ | Left Elbow Pitch |
| 右肘ピッチ | Right Elbow Pitch |
| 左手首ヨー | Left Elbow Yaw |
| 右手首ヨー | Right Elbow Yaw |
| 左手首ピッチ | Left Wrist Pitch |
| 右手首ピッチ | Right Wrist Pitch |
| 左手首ロール | Left Wrist Roll |
| 右手首ロール | Right Wrist Roll |
| 左ハンド | Left Hand |
| 右ハンド | Right Hand |
- Head and Body Panel
- The yaw and pitch of the head and joint angles of the body and base can be input.
- Left arm and right arm panels
- The yaw and pitch of the shoulder, pitch of the elbow, yaw, pitch and roll of the wrists, and four joint angles of the hands can be input using a textbox. Furthermore, the angles can be specified in real numbers.
- Go Button
- This button sends the joint angles specified in the textboxes to HIRO.
- Reset Button
- This button resets all the joint angles to the initial posture values. (Please press the “Go” button again to send these values to HIRO).
Terminating HiroNXGUI
HiroNXGUI can be terminated using any of the following methods.- Right click “HiroNXGUI0” in the RT System Editor and select “Exit” from the Context menu.
- Execute rtexit localhost/(PC name).host_cxt/HiroNXGUI0.rtc.
- Click the “X” button on the title bar of the GUI screen.
- HiroNXGUI will be simultaneously terminated when HIRO is shutdown by pressing the “Shutdown” button.
Environment Setup
Install the following packages in Ubuntu 10.04:- Python (2.6)
- Python-wxgtk2.8
- OpenRTM-aist-Python-1.0
Installation methodology
When the source is acquired from the subversion repository:
(Install subversion from the package beforehand). Check it out from the repository.
% svn co -r 12 https://hironx-interface.googlecode.com/svn/HiroNXInterface/HiroNXGUI/
HiroNXGUI is found in the installation directory and the source files are extracted under the same directory. These files can be executed immediately after extraction.
Source program
The program “WxHiroNXGUI.py” is written in Python.
Python source program- WxHiroNXGUI.py: Main GUI program. (Note that “Wx” is prefixed to the name.)
- HiroNXGUI.py: Consumer RTC program (Primarily, it is a description of action methods such as onInitialize, onExecute, etc.).
- Joint.py: Controller class for the robotic joint information.
- WxHelper.py: GUI controller library.
- bodyinfo.py: HIRO posture data.
- rtc.conf: RT components setup files
- joints.txt: Definition of the sequence and display names of the joints in the joint manipulation tab. It is possible to assign the joint name as “L” or “R” or something else in a different panel. ------- It can open the gaps between the above items.
- main.wrl: The range within which the joints (of the joint-manipulation tab) can be moved is read from this file.
- HiroNXGUI.xrc: GUI resource file.
- lclose.png
- lopen.png
- rclose.png
- ropen.png
The files use “l/r” to indicate “left/right” and “Open/Close” for “opening/closing,” respectively.
The following files are used by the developers to create the GUI screen using WxFormBuilder.- HiroNXGUI.fbp: Source of HiroNXGUI.xrc
- HIROController.idl: IDL (Interface Definition Language) HIROController file
- HiroNX.idl: IDL (Interface Definition Language) HiroNX file
- RTC.xml: RT Builder Source XML
- idlcompile.sh: Batch program for IDL compilation.
- HIROController_idl.py
- HiroNX_idl.py
- ./_GlobalIDL:
- __init__.py
- ./_GlobalIDL__POA:
- __init__.py
Adding Functionalities to HiroNXGUI
In most cases, new commands are added to HiroNX in order to add additional functionalities to HiroNXGUI.idl. For example, let us try adding a method called “newCommand.”The following packages should be installed in the development PC with Ubuntu 10.04 OS:
- wxFormBuilder
- omniidl4
Updating IDL files
Though the “HiroNX.idl” file in the “HiroNXGUI” directory can be directly updated, it is faster to copy the commands if the IDL commands are already added in the RTC provider (HiroNXProvider in this case). (Refer to HiroNXProvider).
Compile the updated IDL using omniidl.
% omniidl -bpython HiroNX.idl
This results in the updating of HiroNX_idl.py.
Adding additional buttons using WxFormBuilder
Start the program WxFormBuilder and open HiroNXGUI.fbp.
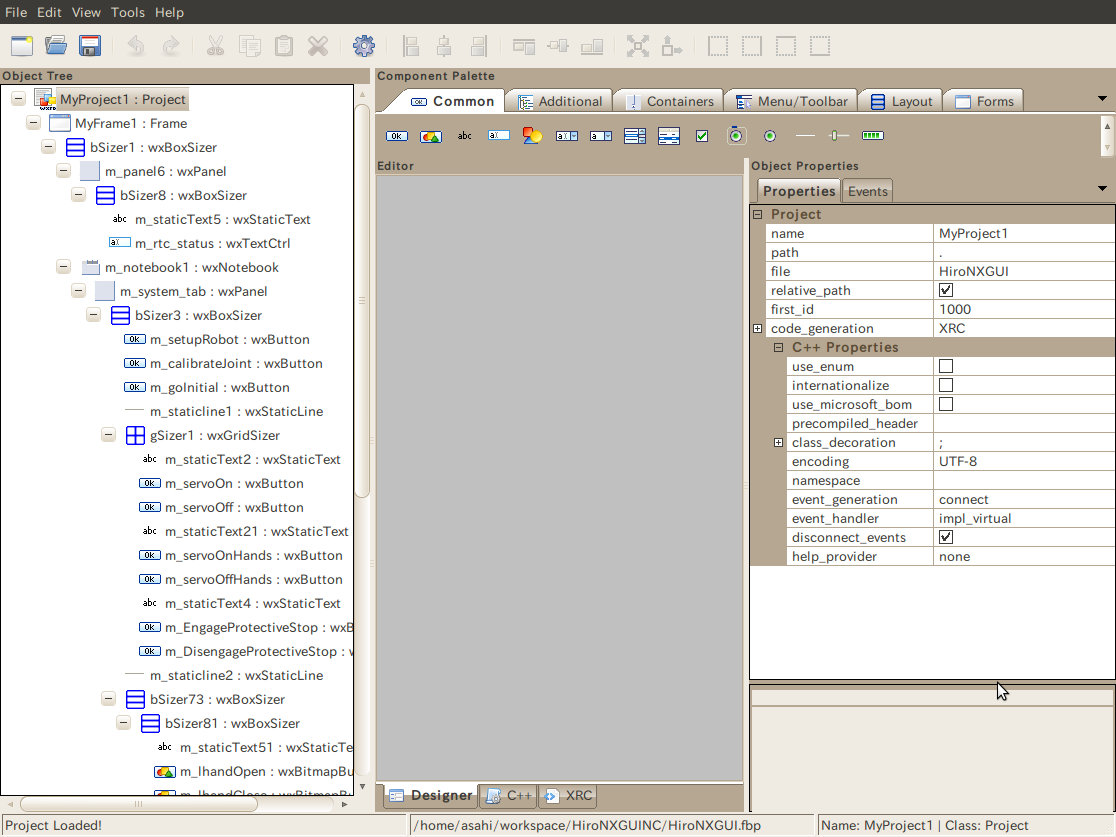
A new button can be added to the Object Tree pane on the left side, under “MyProject1 - MyFrame1- bSizer1 - m_notebook1 - m_system_tab - bSizer3.”

The buttons used while booting HIRO (Set Up Robot, Calibrate Joints, Go Initial Servo ON/OFF, etc.) are generally arranged at the top. The buttons used while shutting down (Go Off Pose, Shutdown, Reboot, etc.) are arranged at the bottom. This time, a new button is placed between “Protective Stop” and “Hand Open.”
The added command is “newCommand,” so the name property of the new button is taken as “m_newCommand.” As for the system tab buttons in WxHiroNXGUI.py, the expression without “m_” is considered a command and it calls the provider RTC, so it is definitely essential to set correct names for the new buttons. Any label can be set to the label property, so it is set to “newCommand” in this case.
Once the button is added, generate HiroNXGUI.xrc by selecting “Generate Code” from the File Menu. Needless to say, please do not forget to save the wxFormBuilder before closing it. With this, the sequence to add a new button is complete. Let us start WxHiroNXGUI.py, click on the new button, and see what happens.
 % ./WxHiroNXGUI.py
 ./WxHiroNXGUI.py
 .
 comp_args: HiroNXGUI
 gen HiroNXGUI
 CommandEvent
 m_newCommand newCommand
 RTC not connected.
Although nothing is connected, a greeting message will be output after “m_newCommand” has been clicked.