Motion Plan Tutorial
Thu, 01/26/2012 - 18:13 — asahi
is displayed in the message column, the procedure has been completed successfully. If SetEnv was forgotten, then
is displayed. Select table-can again and click SetEnv. This operation sets the PRM to make the necessary considerations to ensure that the arm does not interfere with table-can when executing the motion plan of the arm. Then as always, click on Grasp in the Planner bar to make the PA10 grasp the duck.
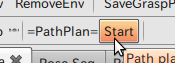
Once the PA10 has grasped the duck, the next step is the motion plan. Click on Start in the Path Planner bar.
When the message:
Is displayed, the procedure has been completed successfully. In addition, at this point a “GraspPoseSeqItem” item is added to the Items tab.
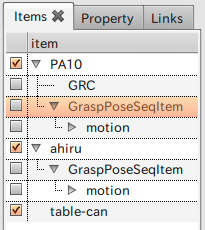
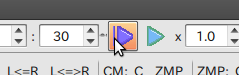
Select GraspPoseSeqItem—a subordinate of PA10—and press Start Animation on the Time bar to view a series of animated images depicting the arm moving and grasping the duck.
 This animation can be saved as serial-numbered static images, using the Movie Generator function in the Tools menu.

The static images, with serial numbers starting from “scene00000000.png,” are stored at ~/workspace/Choreonoid.
PRMプラグイン、Graspプラグインを用いて、プランナーバーと、パスプランバーによりアームの動作計画を行うチュートリアルです。PRMプラグインについてはPRM プラグイン解説をごらんください。
Preparing motion plan (example)
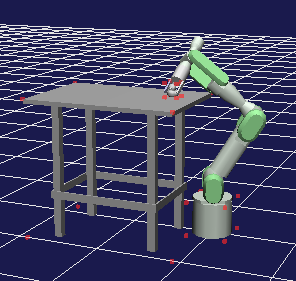
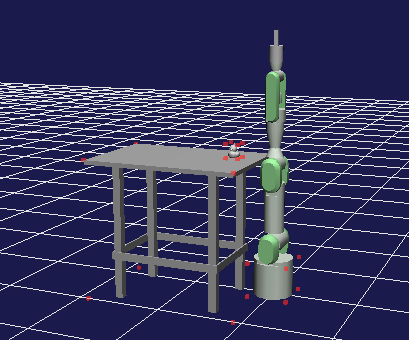
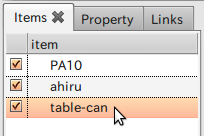
As with the Grasp plugin description, load the PA10 and the duck, and then link each to SetRobot/SetObject respectively.
Next, prepare a table. In the File menu, select Grasp/Object/table-can.wrl in the Open - OpenHRP model file. Check table on the Items tab, relocate the table to an appropriate location (not close enough to interfere with the movement of the PA10 but not so far that it cannot be reached), and place the duck on the table.
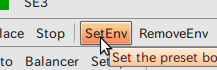
Verify that table-can has been selected with the Items tab and click SetEnv in the Planner bar.
When the message
table-can is the surrounding environment
is displayed in the message column, the procedure has been completed successfully. If SetEnv was forgotten, then
Please select more than one bodyitem
is displayed. Select table-can again and click SetEnv. This operation sets the PRM to make the necessary considerations to ensure that the arm does not interfere with table-can when executing the motion plan of the arm. Then as always, click on Grasp in the Planner bar to make the PA10 grasp the duck.
Once the PA10 has grasped the duck, the next step is the motion plan. Click on Start in the Path Planner bar.
When the message:
Trajectory Planning is finished
Is displayed, the procedure has been completed successfully. In addition, at this point a “GraspPoseSeqItem” item is added to the Items tab.
Select GraspPoseSeqItem—a subordinate of PA10—and press Start Animation on the Time bar to view a series of animated images depicting the arm moving and grasping the duck.
This animation can be saved as serial-numbered static images, using the Movie Generator function in the Tools menu. The static images, with serial numbers starting from “scene00000000.png,” are stored at ~/workspace/Choreonoid.
- Folder
- The destination folder for saving the static images (the default setting is, ~/workspace/Choreonoid).
- Basename
- The base name for the static images (the output image file name is composed of Basename + 8-digit serial number + extension .png).
- Begin
- The starting position for saving (seconds)
- End
- The stopping position for saving (seconds); however, be sure to turn the immediately preceding check switch on.
- FPS
- Frame rate
- Image size
- Size of the images
- Printer-friendly version
- Login to post comments
- 日本語